Iseng aja mo nulis error pada minex
Showing posts with label Computers. Show all posts
Thursday, 5 June 2008
Saturday, 2 February 2008
MS Outlook, Tidak Muncul Window Resize Image Saat Kirim Gambar
Jika terjadi seperti ini, mau mengirim gambar dari outlook tapi tidak muncul window resize image, lakukanlah langkah berikut :
1. Masuk RUN
2. Ketik REGSVR32 SHIMGVW.DLL ada spasi diantara 2 dan S
3. Enter
4. Akan muncul window dialog yang menyatakan installasi sukses
5. Log off kemudian Log in kembali
Smoga Sukses
HardDisk SATA Tidak dikenal WIN XP
Dikarenakan type HardDisk NoteBook saat ini sudah mempergunakan SATA maka dalam penginstalannya harus mempergunakan DiskDrive External (USB DiskDrive) untuk dapat menginstall driver HardDisk SATA agar dapat dikenali oleh Operating System (Windows XP). Hal ini dapat diketahui apabila pada saat instalasi Windows XP, terjadi ERROR dan muncul pemberitahuan Harddisk " TIDAK ADA/TIDAK DIKENALI"
Tapi hal di atas tidak mutlak diperlukan apabila Konfigurasi BIOS dapat dirubah dalam mengenali peripheral Hdisk tersebut untuk menjadi IDE yaitu dengan cara masuk ke Menu BIOS , sebagai berikut:
1. Masuk Menu BIOS
2. pilih Menu System Configuration
3. pilih SATA NATIVE SUPPORT
4. Rubah menjadi DISABLE
5. Save perubahan dan keluar dari Menu BIOS
Jika tidak ada pilihan SATA NATIVE SUPPORT di Bios maka tunggu tulisan selanjutnya hehe..:p
Tapi hal di atas tidak mutlak diperlukan apabila Konfigurasi BIOS dapat dirubah dalam mengenali peripheral Hdisk tersebut untuk menjadi IDE yaitu dengan cara masuk ke Menu BIOS , sebagai berikut:
1. Masuk Menu BIOS
2. pilih Menu System Configuration
3. pilih SATA NATIVE SUPPORT
4. Rubah menjadi DISABLE
5. Save perubahan dan keluar dari Menu BIOS
Jika tidak ada pilihan SATA NATIVE SUPPORT di Bios maka tunggu tulisan selanjutnya hehe..:p
Wednesday, 6 June 2007
HOW TO: Switch the broken Jet Direct external with the new one
To reset the pre-configured IP that already embedded inside the new Jet Direct, just PRESS and HOLD the [Test] button BEFORE you plugged in the UTP/Network cable into the Jet Direct.
While the [Test] button still on hold, plugged in the UTP/Network cable into the Jet direct, also you can plug the printer cable from the printer for testing printing the IP Configuration.
After press the [Test] button several times, then you will get the information that the embedded IP addresses is reset into 0.0.0.0 and then it will get the new IP address through BOOTP/DHCP protocol, in this case we get the 148.175.154.64 as the new IP address
To make sure that we connect into the right Jet Direct external, just do a simple test.
- While the UTP/Network cable is plug into the new Jet Direct, ping with “-t” parameter into the specified IP address 148.175.154.64, here you must get a continuously reply from the Jet Direct
- Now, unplugged the UTP/Network cable from the new Jet Direct, and look inside the ping window if you get the “Request timed out” message
- And the last is to plugged in again the UTP/Network cable is plug into the new Jet Direct, and here you must see that the connection to IP address 148.175.154.64 is back to live (See this picture below)
To re-configured the IP address into the desired IP addresses, you have to telnet to the current IP address 148.175.154.64 and change the configuration inside it
From Command Prompt, just type>telnet 148.175.154.64 followed by the [Enter] key
and type>”/” followed by the [Enter] key to display the current configuration
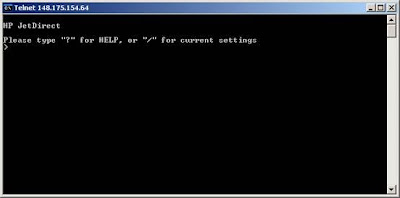
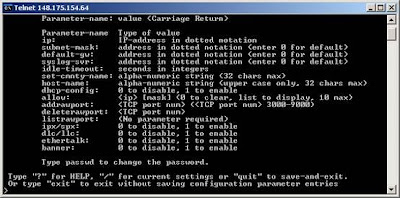
or “/” followed by the [Enter] key for displaying the current configuration 
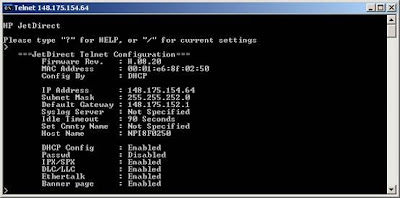
or “/” followed by the [Enter] key for displaying the current configuration 
To change the IP address to the new one, type >ip: 148.175.152.152 followed by the [Enter] key
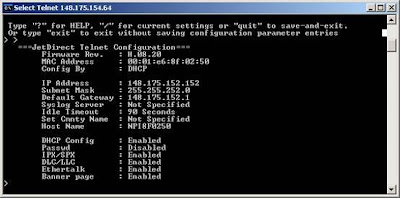
After display the changes IP address using the "/" key DO NOT forget to type >”quit” to save –and-exit
Since you already change the IP address into 148.175.152.152 and save it, then you must establish the connection using the new IP address, just type>telnet 148.175.152.152 followed by the [Enter] key
Since the configuration already the same, you DO NOT need to change the Subnet Mask, Default Gateway, Syslog Server, Idle Timeout, Set Cmnty Name, and Host Name.
To disable the DHCP Config, type> dhcp-config: 0 [Enter]
To disable the IPX/SPX, type> ipx/spx: 0 [Enter]
To disable the DLC/LLC, type> dlc/llc: 0 [Enter]
To disable the Ethertalk, type> ethertalk: 0 [Enter]
To disable the Banner page, type> banner: 0 [Enter]
DO NOT forget to type >”quit” to save –and-exit
Tuesday, 1 May 2007
HP DesignJet 1055CM Service Test
Entering the Service Tests Menu
note :
- Make sure the printer is switched OFF from the power switch on the front of the printer and NOT from the power switch on the back of the printer
- Hold the COLOR key down and switch the Printer ON using the front power switch. Wait until the message "Initializing" is displayed on the front-Panel before releasing the COLOR key
- Once inside the service test menu use the Arrow keys to scroll through the "Service Tests" selections
- Press the Enter key to begin a specific test when the required Service Test is highlighted
note :
- If the printer is not used for 3 minutes, the printer hangs and you must repeat the above steps to enter the service mode again
- In some cases a quick press of a button may not be recognized by the printe. When pressing a button, be sure to press it deliberately and all the way to the bottom of its travel
- If the printer hangs up during a test, switch the printer off and restart from step 1
Error 06030800000008
Sudah dua kali aku bertemu dengan yang namanya Error 06030800000008 pada Plotter HP DesignJet 1055CM dan aku cari di manual book tidak ketemu. Yang Pertama Aku tidak bisa menangani jadi dengan berat hati aku kirim tuh plotter ke HP service, karna setelah ak cek dengan menggunakan Service Test(Diagnosa) komponen plotter tidak cuma satu yang rusak dan susah untuk memvonis part mana yang rusak kalo kita tidak punya part yang sama untuk mencoba replace part yang jadi tersangka.
Beberapa bulan kemudian aku menemukan kejadian yang sama yaitu Error 06030800000008. Error 06030800000008 ini bisa terjadi karna supply power +12 v ke carriage kurang ato printhead rusak, untuk kali ini aku lakukan beberapa hal berikut untuk pengecekan:
- Replace Printhead
- Jika masih muncul error lakukan Service Test
- Jika Pada waktu service test error ato stop, maka cobalah untuk memeriksa cable data yang menghubungkan Carriage dengan matherboard
- Jika service test lewat ato sukses dan error masih muncul maka silahkan kirim plotter ke HP service center karna kemungkinan yang rusak adalah matherboard
Friday, 20 April 2007
Blue Screen
When windows xp detects an error from which it can recover, it reports error information in full screen, non-windowed, text mode. These stop messages, which also referred to as stop errors or blue screens, provide information that is specific to the problem detected by the windows xp kernel. File system errors, viruses, hard disk corruption or controller problems can cause the following stop messages;
Stop 0x00000024 or NTFS_FILE_SYSTEM
This stop message also known asa Stop 0x24, indicates that a problem occurred within Ntfs.sys, which is the driver file that allows the system to read and write to NTFS volumes.
Stop 0x00000050 or PAGE_FAULT_IN_NONPAGED_AREA
This stop message also known as stop 0x50, occurs when requested data is not found in memory. The system generates a fault, which indicates that invalid system memory has been referenced. This fault can occur due to a variety of error conditions, such as bugs in antivirus software, a corrupted NTVS volume or faulty hardware (typically related to defective RAM, be it main memory, L2 RAM cache or video RAM).
Stop 0x00000077 or KERNEL_STACK_INPAGE_ERROR
This stop message also known as stop 0x77, indicated that requested page of kernel data from the paging file could not be read into memory. Stop 0x77 can be caused by a number of problems, such as:
Stop 0x0000007A or KERNEL_DATA_INPAGE_ERROR
This stop message also known as stop 0x7A, indicates that the requested page of kernel data from the paging file could not be read into memory. One of the following conditions usually causes a stop 0x7A : a bad sector in a paging file, a virus, a disk controller error, defective hardware or failing RAM. In rare cases a stop 0x7A occurs when nonpaged pool resources run out
Stop 0x0000007B or INACCESSIBLE_BOOT_DEVICE
This stop message also known as stop 0x7B, indicates that windows xp lost access to the system volume or boot volume during the startup process. This error always occurs while the system is starting and is often caused by one of the following:
Stop 0x00000024 or NTFS_FILE_SYSTEM
This stop message also known asa Stop 0x24, indicates that a problem occurred within Ntfs.sys, which is the driver file that allows the system to read and write to NTFS volumes.
Stop 0x00000050 or PAGE_FAULT_IN_NONPAGED_AREA
This stop message also known as stop 0x50, occurs when requested data is not found in memory. The system generates a fault, which indicates that invalid system memory has been referenced. This fault can occur due to a variety of error conditions, such as bugs in antivirus software, a corrupted NTVS volume or faulty hardware (typically related to defective RAM, be it main memory, L2 RAM cache or video RAM).
Stop 0x00000077 or KERNEL_STACK_INPAGE_ERROR
This stop message also known as stop 0x77, indicated that requested page of kernel data from the paging file could not be read into memory. Stop 0x77 can be caused by a number of problems, such as:
- Bad sectors on the hard disk
- Defective or loose cabling, improper SCSI termination or the controller not seeing the hard disk
- Another device is causing a resource conflict with the storage controller
- Failing RAM
Stop 0x0000007A or KERNEL_DATA_INPAGE_ERROR
This stop message also known as stop 0x7A, indicates that the requested page of kernel data from the paging file could not be read into memory. One of the following conditions usually causes a stop 0x7A : a bad sector in a paging file, a virus, a disk controller error, defective hardware or failing RAM. In rare cases a stop 0x7A occurs when nonpaged pool resources run out
Stop 0x0000007B or INACCESSIBLE_BOOT_DEVICE
This stop message also known as stop 0x7B, indicates that windows xp lost access to the system volume or boot volume during the startup process. This error always occurs while the system is starting and is often caused by one of the following:
- Hardware problems
- Corrupted or incompatible storage drivers
- File system problems
- Boot sector viruses
- Outdated firmware
- The controller or driver for the startup device (typically the hard disk) failed to initialize the necessary hardware
- File system initialization failed because the system did not recognize the data on the boot device
Chat Menggunakan Hand Phone
Ingin hati menggunakan Yahoo messenger...
Ingin hati menggunakan MSN messenger...
Ingin hati menggunakan Google Talk...
Ingin hati menggunakan MSN messenger...
Ingin hati menggunakan Google Talk...
Yang pasti ingin rasanya sambil kerja bisa menggunakan messenger, tapi apa mau dikata aku kerja diperusahaan dengan internet policy yang cukup ketat, untuk masuk ke situs tertentu tidak mungkin aku lakukan, apalagi untuk situs yang berbau entertainment, ampun-ampun deh....
Pernah suatu hari kami user support yang dengan dengan istilah keren disebut Help Desk diberi 1 komputer yang bisa untuk akses semua messenger oleh orang jaringan, tapi itupun tidak berlangsung lama, setelah berjalan sekitar 5 bulan akhirnya ketauan juga sama atasan, izin langsung dicabut yaaaahhh...nasib....
Setelah sekian lama ga pake messenger akhirnya aku cari2 software untuk bisa akses messenger dari hand phone, dan software tersebut aku temukan disini, caranya cukup mudah tinggal di copy ke hand phone trus install, tapi sebelumnya pastiin dulu GPRS sudah aktif. sekarang tuk akses yahoo messenger tinggal buka hand phone dan berchat ria hehe...
Pernah suatu hari kami user support yang dengan dengan istilah keren disebut Help Desk diberi 1 komputer yang bisa untuk akses semua messenger oleh orang jaringan, tapi itupun tidak berlangsung lama, setelah berjalan sekitar 5 bulan akhirnya ketauan juga sama atasan, izin langsung dicabut yaaaahhh...nasib....
Setelah sekian lama ga pake messenger akhirnya aku cari2 software untuk bisa akses messenger dari hand phone, dan software tersebut aku temukan disini, caranya cukup mudah tinggal di copy ke hand phone trus install, tapi sebelumnya pastiin dulu GPRS sudah aktif. sekarang tuk akses yahoo messenger tinggal buka hand phone dan berchat ria hehe...
Saturday, 14 April 2007
Multihoming
When a computer configured with more than one IP address, it is referred to as a multihomied system. Multihoming is supported in two different ways:
- Multiple network adapter or media types per physical network. The network adapters can be for similar or dissimilar network. For example, a host with one ethernet and one token ring adapter installed, each linked to a separate network, requires IP addresses to be bound to both adapter. There are no restrictions other than hardware.
- Multiple IP addresses per network adapter. A computer can access multiple subnets that are logically separated, but bound to a single network adapter, such a configuration might be used in an environment where a host requires access to different divisions of a corporation network that are separated by different subnets.
Thursday, 12 April 2007
Automating Logon
Using windows xp professional, you can automate the logon process by storing your password and other pertinent in the registry. Using this features, other users can start your computer and use the account you enable to log on automatically.
To enable autologon, use the following procedure :
- In the Run dialog box, type regedit.exe, and then click OK
- Navigate to the registry subkey : HKEY_LOCAL_MACHINE\SOFTWARE\Microsoft\Windows NT\CurrentVersion\Winlogon
- Double-click the DefaultUserName entry
- In the Value Data box, type your user name and then click OK
- If the DefaultPassword entry does not exist, click New on the Edit menu and then select String Value. In the Name box, type Default Password, then double-click DefaultPassword, then In Value Data field, type password
- Double-click AutoAdminLogon, then enter 1 in the Value data box
- Close the registry editor
- Restart the computer
Monday, 9 April 2007
Configuring ISDN Support
Windows XP Professional provides built-in support ISDN. before configure ISDN on a computer, you need the following:
- Installed internal or external ISDN adapter
- ISDN telephone line service at the location where you use dial-up networking to connect to the internet
- ISDN telephone line service at the remote location to which you want to connect, usually either your ISP or a remote access server
- In control panel, open Add Hardware
- In Add Hardware Wizard, click next
- Select Add/Troubleshoot a device, and then click next
- If windows XP does not automatically detect the ISDN adapter, select Add a new device, and then click Next
- If you want windows xp to attempt to find the ISDN adapter, select Yes, search for new hardware, or If you want to automatically select the ISDN adapter, select No, I will select it from a list, and then follow the instructions.
Wednesday, 28 March 2007
Recovery Console
Recovery Console is a character-mode environment that you can run directly from the Windows XP Professional operating system CD or for x86-based systems, install as a startup option. Unlike normal or safe mode, the windows graphical user interface (GUI) is not available within recovery console. Recovery console provides a set of command for advance users who are comfortable working outside the windows GUI environment.
If you cannot start windows xp professional in safe mode or normal mode, recovery console allows you to perform many troubleshooting and maintenance tasks, such as disabling problem drivers and services that you suspect are causing startup problem. Recovery console is separate from the command-line Cmd.exe shell and grants limited access to local NTFS and file allocation table (FAT) formated volumes
Saturday, 24 March 2007
Interoperating IBM Host Systems and Windows XP Professional
Microsoft Windows XP Professional and Microsoft Host Integration Server 2000 allow users to gain direct access to IBM Corporation Host Systems. Host Integration Server 2000 is the solution for connecting personal computer-based client and servers to IBM host systems. It is also possible for users to connect to an IBM host system directly without using a gateway, such as Host Integration Server 2000, through TCP/IP. Host Integration Server 2000 client software allows you to use the interfaces to read and change the configuration file, start and stop services and connections, or reset Logical Units (LUs).
Windows XP Professional uses TCP/IP for its network architecture. IBM systems increasingly use TCP/IP, but many installations still use Systems Network Architecture (SNA). In order for Windows XP Professional-based computers to communicate with IBM host systems, either a gateway device to interpret the two different network protocols pr a common network protocol is required.
To connect to IBM host by using a gateway device, you must have a local area network (LAN) protocol on Windows XP Professional and a gateway that provides the translation between the LAN protocol and the IBM host protocol or data stream. Host Integration Server 2000 is a gateway that provides this translation service.
To connect to an IBM host without using Host Integration Server 2000 to provide the gateway services, you must ensure that both Windows XP Professional and the IBM host have the same protocol installed and configured.
Windows XP Professional uses TCP/IP for its network architecture. IBM systems increasingly use TCP/IP, but many installations still use Systems Network Architecture (SNA). In order for Windows XP Professional-based computers to communicate with IBM host systems, either a gateway device to interpret the two different network protocols pr a common network protocol is required.
To connect to IBM host by using a gateway device, you must have a local area network (LAN) protocol on Windows XP Professional and a gateway that provides the translation between the LAN protocol and the IBM host protocol or data stream. Host Integration Server 2000 is a gateway that provides this translation service.
To connect to an IBM host without using Host Integration Server 2000 to provide the gateway services, you must ensure that both Windows XP Professional and the IBM host have the same protocol installed and configured.
Monday, 19 March 2007
Windows XP Professional and NetWare Connectivity
Windows XP Professional uses Client Service for NetWare and the NWLink protocol to provide connectivity between Windows XP Professional and servers running Novell Directory Services (NDS) or NetWare bindery-based servers. NWLink is the Microsoft implementation of the IPX/SPX protocol.
To connect a computer running Windows XP Professional to a NetWare server or network, you need services and protocols that allow the two networking systems to communicate with each other. These services and protocols include:
- Client Service. Allows the Windows XP Professional client to access NetWare file, print and directory services. Both Novell and Microsoft provide a client service for this purpose. Each client service includes a redirector component that enables packet forwarding for the differing file and print service protocols.
- Network Protocol. Connects the Windows XP Professional client to a Novell NetWare network. If the NetWare network is running Internetwork Packet Exchange/Sequenced Packet Exchange (IPX/SPX) instead of TCP/IP, Windows XP Professional provides NWLink IPX/SPX/NetBIOS-Compatible Transport Protocol (NWLink).
Tuesday, 13 March 2007
Interoperating Unix and Windows XP
Microsoft offers two UNIX interoperability components: Services for UNIX 2.0 and Interix 2.2 services for Unix provides add-on components that you can use to integrate Windows XP.
Professional client into a UNIX environment. in addition to providing a subset of Transmission Control Protocol/Internet Protocol (TCP/IP) for connectivity, it also provides manageability components that simplify network administration and account management across both platforms.
Wit Interix 2.2 you can run UNIX-based applications and scripts on Microsoft Windows 2000 server and Windows XP Professional. It provides an environment that includes more then 300 tools, and is fully integrated whit the windows desktop, security model and file system. Interix 2.2 includes the Interix 2.2 Software Development Kit (SKD), which your organization can use as an aid in migrating existing UNIX-base applications into the Interix environment.
Professional client into a UNIX environment. in addition to providing a subset of Transmission Control Protocol/Internet Protocol (TCP/IP) for connectivity, it also provides manageability components that simplify network administration and account management across both platforms.
Wit Interix 2.2 you can run UNIX-based applications and scripts on Microsoft Windows 2000 server and Windows XP Professional. It provides an environment that includes more then 300 tools, and is fully integrated whit the windows desktop, security model and file system. Interix 2.2 includes the Interix 2.2 Software Development Kit (SKD), which your organization can use as an aid in migrating existing UNIX-base applications into the Interix environment.
UNIX Print Servers
Windows XP Professional provides services for printing to and from UNIX resources, there are multiple ways to implement these services, this is one of that ways
Before you can print to a remote Unix printer configured using Line Printer Daemon (LPD), you must configure Windows XP Professional to print by using Line Printer Remote (LPR), You must first install Print Services for UNIX, and then install and configure a printer using LPR as the printer port.
To install Printer Services for UNIX
Before you can print to a remote Unix printer configured using Line Printer Daemon (LPD), you must configure Windows XP Professional to print by using Line Printer Remote (LPR), You must first install Print Services for UNIX, and then install and configure a printer using LPR as the printer port.
To install Printer Services for UNIX
- In Control Panel, double-click Network Connections
- On the Advanced menu, click Optional Networking Components
- Select Other Network File and Print Services, and then click Details
- Select Print Services for UNIX, and then click OK
To add an LPR port
- In Control Panel, double-click Printers and Faxes
- Double-click Add Printer
- Click Local printer, clear the Automatically detect my printer check box
- Click create a new port, and then click LPR port
- In Name or Address of server providing LPD, type the Domain Name System (DNS) name or IP address of the host for the printer you are adding
- In the Name of printer or print queue on that server text box, type the name of the printer as it is identified by the host, which is either the direct-connect printer itself or the UNIX computer
- Then Follow the instructions to finish installing the printer
Friday, 9 March 2007
Resolving "Compile error in hidden module: Autoexec", When You Try To Start Microsoft Word
SYMPTOMS
When you try to start Word, you may receive the following error message:
Compile error in hidden module: Autoexec
CAUSE
This problem may occur if a third-party add-in program that is stored in the Startup folder for Office conflicts with Word.
WORKAROUND
To work around this problem, determine which add-in program conflicts with Word by moving the add-in files and folders out of the Startup folder one-by-one. To do so, follow these steps.
NOTE: Because there are several versions of Microsoft Windows, the following steps may be different on your computer. If they are, see your product documentation to complete these steps.
- Quit Word.
- Locate and then click the following folder, where drive is the drive on which Windows is installed:
drive:\Program Files\Microsoft Office\Office\Startup
NOTE: This is the default location for the Office\Startup folder. If you installed Word to a different location, the path to this folder on your computer may be different.
- Right-click one of the third-party add-in files or folders, and then click Cut.
- Click Start, right-click My Documents, and then click Paste.
- Try to start Word.
If Word does not start successfully, repeat steps 3 through 5 for each third-party add-in file and folder in the Office\Startup folder. - After you determine which third-party add-in program or folder is causing the problem, move the other third-party add-in files and folders back to the Office\Startup folder.
HTML to Redirect a WWW Page
Wednesday, 7 March 2007
Import PDF content into PowerPoint
I. High resolution bitmaps from Acrobat ReaderWith nothing more than the free Acrobat Reader, you can import high or low resolution bitmaps of PDF pages into your presentations.
You probably have a copy of Adobe Acrobat Reader software so you can view and print PDFs
- Open your PDF in Reader.
- Choose the Graphics Select Tool from the toolbar (click and hold the toolbar button to the right of the zoom tool; when the flyout menu appears, click the rightmost button on it).
- Use the Graphics Select Tool to drag a rectangle surrounding the area of the page you'd like to use in your PowerPoint presentation
- Choose Edit, Copy or press Ctrl+C, then switch to PowerPoint and choose Edit, Paste or press Ctrl+V to paste a copy of the selected area of the PDF file into your presentation.
- If the result is too low-rez, switch back to Reader and without changing anything else, type a higher zoom percentage into the zoom text box at the lower left of the Reader window, then re-do the copy and paste into PowerPoint. The higher the zoom percentage, the higher the resolution of the image that comes into PowerPoint. Don't get carried away here ... zoom in by degrees until you get a decent image in PowerPoint. You can bring your system to its knees if you zoom in too far.
In that case, you'll want to try Shyam Pillai's free LiveWeb add-in
Load the add-in, select Insert | Web Pages.
In the address field type the path to the PDF file and proceed to complete the wizard prompt.
During slide show, the pdf file will be displayed.
Version Supported
|
PowerPoint 97/2000/2002/2003
|
Download
| |
Installation Instructions (applicable only for zip) :
|
1. Extract the contents of the zip to a folder.
2. Launch PowerPoint. 3. Click on Tools | Add-ins to bring up the add-ins window. 4. Click on Add to bring up the 'Add New PowerPoint Add-in' dialog box. 5. Navigate to the folder where the contents of the zip file was extracted and select 'LiveWeb.ppa' and click on OK. 6. You might be prompted with the macro virus warning. Enable the macros. When the Add-in is properly loaded, it will display a 'X' against the add-in name. 7. That's it. You have successfully loaded the add-in. Now put it to use.
Note: If you are unable to load the add-in check your macro security setting.
|
Usage
|
1. Click on Insert | Web Pages...
2. Enter the list of web page address that you wish to create.
3. Provide the additional info required.
4. LiveWeb will create slides with web browser controls embedded on the slides
5. Run the slide show.
6. The web pages will be displayed during the slide show and refreshed at real-time.
|
In [LiveWeb Wizard] window, click [NEXT]
Type the file location, i.e. [file:/D:\Temp\M095 - jalan hijau attach_a.pdf]
Click [ADD] button, click [NEXT]
Check [Yes, refresh … (real-time update)], click [NEXT]
Leave size web page as default, also leave set shape position as default, click [NEXT]
Click [FINISH] to insert the PDF file
PDF successfully inserted, click [OK]
Click [Slide Show] button @ the lower left of PowerPoint window to test it
Recover WinXP from “NTLDR missing” problem
Boot from Windows XP Professional CD with SP1
Press [R] to Repair
[ENTER]
Leave tour keyboard untouch to automatically choose [US] as language default, or press any key at your keyboard and choose language [US], press [ENTER]
Choose [1] for C:\WINDOWS, press [ENTER]
Type LOCAL ADMIN
password: xxxxxxxxxx, press [ENTER]
From Command Prompt, type:
C:\WINDOWS> CHKDSK C: /p /r
After Recovery of C: drive completed, do once again for D: drive,
C:\WINDOWS> CHKDSK D: /p /r
After all “Recovery Success” message appear, type:
C:\WINDOWS> EXIT
The PC will REBOOT automatically
Subscribe to:
Posts (Atom)


