To reset the pre-configured IP that already embedded inside the new Jet Direct, just PRESS and HOLD the [Test] button BEFORE you plugged in the UTP/Network cable into the Jet Direct.
While the [Test] button still on hold, plugged in the UTP/Network cable into the Jet direct, also you can plug the printer cable from the printer for testing printing the IP Configuration.
After press the [Test] button several times, then you will get the information that the embedded IP addresses is reset into 0.0.0.0 and then it will get the new IP address through BOOTP/DHCP protocol, in this case we get the 148.175.154.64 as the new IP address
To make sure that we connect into the right Jet Direct external, just do a simple test.
- While the UTP/Network cable is plug into the new Jet Direct, ping with “-t” parameter into the specified IP address 148.175.154.64, here you must get a continuously reply from the Jet Direct
- Now, unplugged the UTP/Network cable from the new Jet Direct, and look inside the ping window if you get the “Request timed out” message
- And the last is to plugged in again the UTP/Network cable is plug into the new Jet Direct, and here you must see that the connection to IP address 148.175.154.64 is back to live (See this picture below)

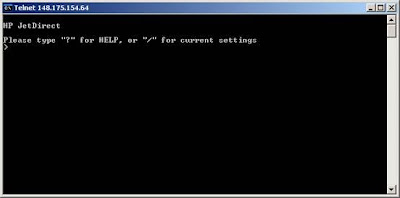
To re-configured the IP address into the desired IP addresses, you have to telnet to the current IP address 148.175.154.64 and change the configuration inside it
From Command Prompt, just type>telnet 148.175.154.64 followed by the [Enter] key

and type>”/” followed by the [Enter] key to display the current configuration
 or “/” followed by the [Enter] key for displaying the current configuration
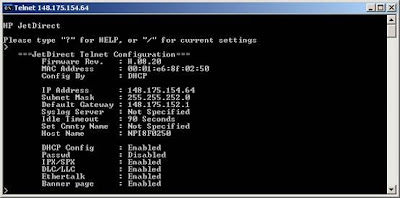

 or “/” followed by the [Enter] key for displaying the current configuration
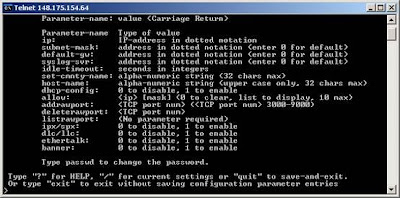
To change the IP address to the new one, type >ip: 148.175.152.152 followed by the [Enter] key
 After display the changes IP address using the "/" key DO NOT forget to type >”quit” to save –and-exit
Since you already change the IP address into 148.175.152.152 and save it, then you must establish the connection using the new IP address, just type>telnet 148.175.152.152 followed by the [Enter] key
Since the configuration already the same, you DO NOT need to change the Subnet Mask, Default Gateway, Syslog Server, Idle Timeout, Set Cmnty Name, and Host Name.
To disable the DHCP Config, type> dhcp-config: 0 [Enter]
To disable the IPX/SPX, type> ipx/spx: 0 [Enter]
To disable the DLC/LLC, type> dlc/llc: 0 [Enter]
To disable the Ethertalk, type> ethertalk: 0 [Enter]
To disable the Banner page, type> banner: 0 [Enter]

DO NOT forget to type >”quit” to save –and-exit
No comments:
Post a Comment